Tigger – Free Crochet Pattern
2. Introduction
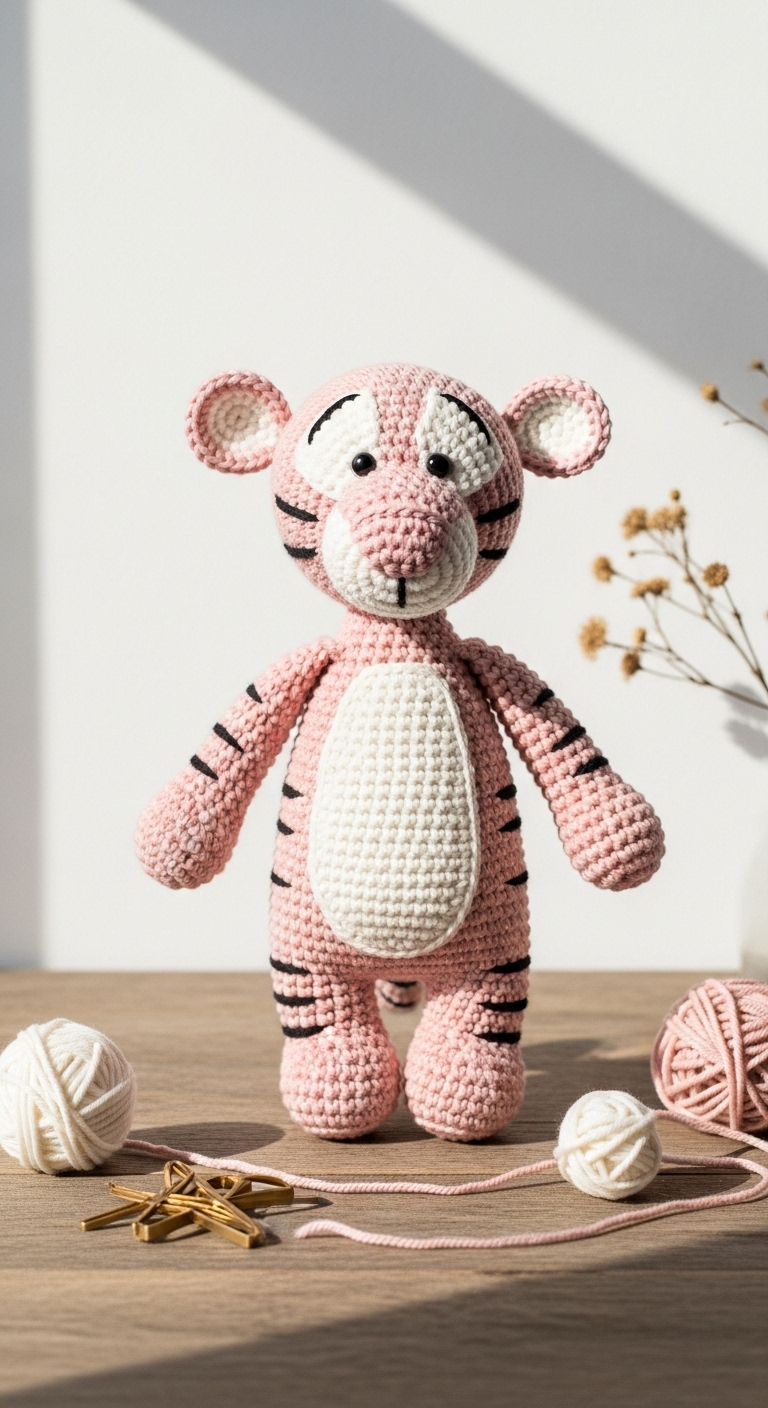
Welcome to the delightful world of crochet! Today, we’re diving into a fun and whimsical project: creating your very own Tigger plushie. This lovable bouncing tiger measures approximately 12 inches tall, making it the perfect cuddly companion for anyone who loves a touch of nostalgia. Crafted with soft, plush yarn, Tigger’s vibrant orange and black hues, complemented by white accents, bring this beloved character to life.
The yarn choices for this project include a soft worsted weight yarn in shades like bright orange, deep black, and creamy white. These adult-friendly colors provide a modern twist, ensuring that your finished plushie is not only adorable but also stylish enough to be displayed in any home. This project is both quick and enjoyable, making it an excellent choice for crochet enthusiasts of all skill levels, especially beginners! Tigger makes a fantastic gift for children or fans of classic literature, adding a sprinkle of joy to any occasion.

3. Materials Needed
– Yarn: Worsted weight yarn in bright orange (approx. 150 yards), deep black (approx. 30 yards), and creamy white (approx. 30 yards)
– Hook: 3.5mm crochet hook
– Eyes: 12mm safety eyes
– Stuffing: Polyester fiberfill stuffing
– Needle: Tapestry needle for sewing
– Marker: Stitch marker
– Optional extras: Pipe cleaners for added bounce (for the tail), and buttons for decorative features
4. Designer Notes / Tips
When crafting Tigger, keep in mind that the plushie will have various textures due to color changes and the use of different stitches. To create a more defined design, I recommend using the single crochet (sc) stitch throughout, which gives a pleasing, smooth finish. For stuffing, I suggest using firm polyester fiberfill to maintain the plushie’s shape while still being cuddly.
As you assemble the pieces, be sure to use a tapestry needle for sewing; this will allow you to weave in ends neatly and securely attach each body part. For yarn substitutions, consider using a soft cotton blend yarn for a lightweight option or an acrylic blend for added durability. When checking gauge, it’s important to crochet tightly enough to prevent stuffing from peeking through, especially in the head and body areas.
If you’re making Tigger for a child, ensure that you securely attach all components, including eyes, to avoid any safety hazards.
5. Pattern Instructions
For Plushies:
Head:
Body:
Arms (make 2):
Legs (make 2):
Ears (make 2):
Tail:
Assembly:
– Attach the eyes between rounds 5 and 6 of the head, placing them approximately 8 stitches apart.
– Sew the ears on either side of the head, ensuring they are positioned slightly above the eyes for a playful look.
– Attach the arms and legs securely to the body, ensuring they are evenly spaced.
– Finally, attach the tail at the back of the body.
6. Closing & Social Engagement
Congratulations on crafting your very own Tigger plushie! I’d love to see your version! Leave a comment below and share your experiences. What color combination will you try? Don’t hesitate to express your creativity! Share your finished Tigger on social media and inspire fellow crochet lovers to join in on the fun!