Summer Hello Kitty Plush – Crochet Pattern (Amigurumi)
2. Introduction
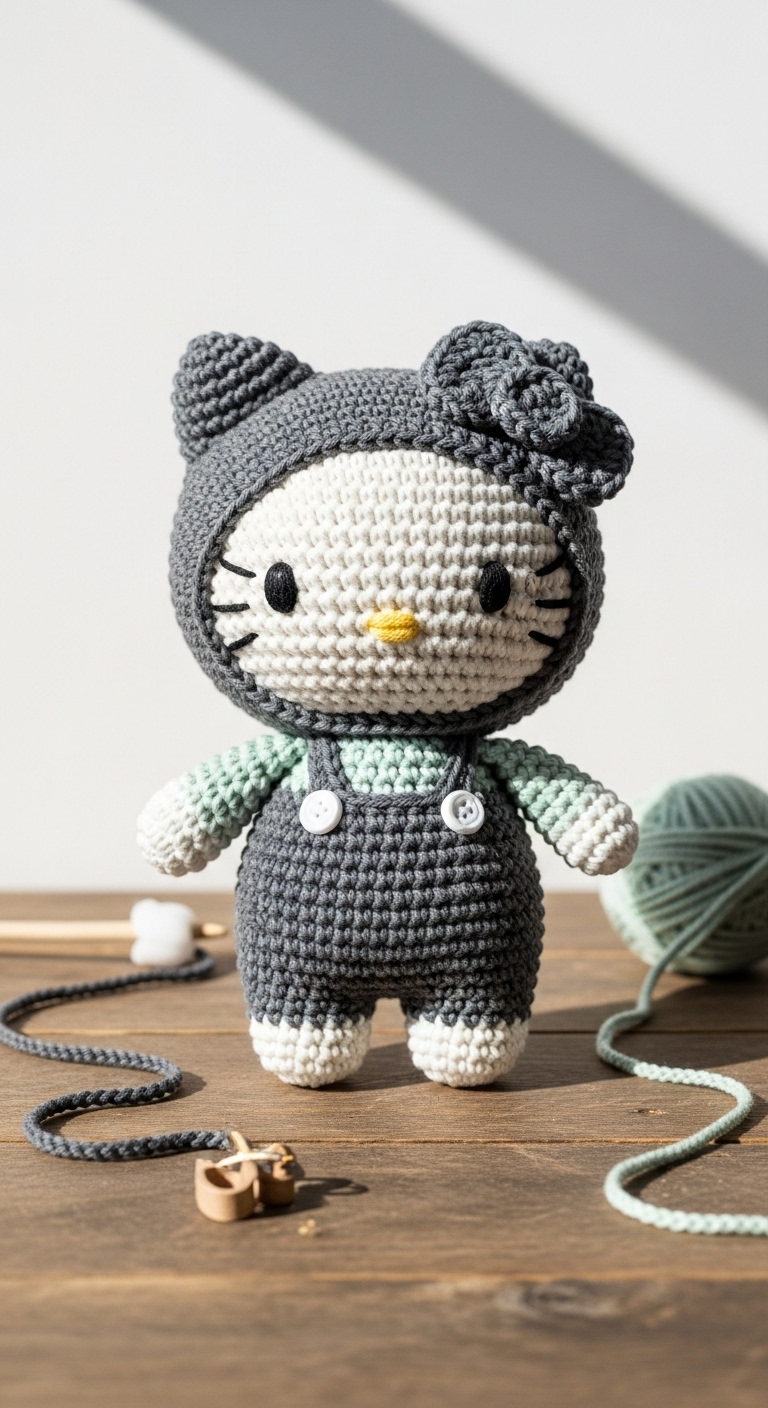
Welcome to the delightful world of crochet with our Summer Hello Kitty Plush! This adorable amigurumi features the iconic Hello Kitty design, perfect for brightening up your summer days. This sweet plushie is approximately 10 inches tall, making it a lovely companion for both kids and adults alike. With its charming features and soft, cuddly texture, this crochet project is sure to be a hit wherever it goes!
For this project, we’ll be using lightweight yarn in cheerful adult-friendly colors like soft pink, bright yellow, and crisp white. These colors not only evoke the fun, vibrant essence of summer but also allow you to play with your creativity, making this plushie truly special. Whether you’re treating yourself or gifting it to a fellow Hello Kitty lover, the satisfaction of creating this plushie will bring joy to your crafting experience. This project is beginner-friendly, making it accessible for those just starting their crochet journey!

3. Materials Needed
– Yarn: Worsted weight yarn in soft pink (about 150 yards), bright yellow (about 50 yards), and crisp white (about 100 yards)
– Hook: 3.5mm or 4.0mm crochet hook
– Eyes: Safety eyes (12mm) OR black embroidery thread for sewing eyes
– Stuffing: Polyester fiberfill stuffing
– Needle: Tapestry needle for sewing pieces together
– Marker: Stitch marker for marking rounds
– Optional extras: A small piece of fabric for a summer-themed bow, pipe cleaners for added structure if desired
4. Designer Notes / Tips
When working on your Summer Hello Kitty Plush, remember that the magic ring is essential for the head’s neat start. If you’re unfamiliar with this technique, don’t worry! It’s simply a method that creates a tight closure for your first round of stitches. For a soft yet structured plushie, I recommend stuffing it lightly; this will allow your Hello Kitty to maintain its shape without being overly firm.
Assembling the pieces can be a rewarding part of the process. Use your tapestry needle to join each part securely, hiding yarn tails as you go to keep everything neat. If you’re considering yarn substitutions, any worsted weight yarn will work beautifully—just be mindful that different fibers might alter the texture slightly. Gauge isn’t critical for this project, but a tighter tension will help maintain the plushie’s overall shape.
Finally, if you’re making this plushie for a child, consider using embroidered eyes instead of safety eyes to eliminate any choking hazards.
5. Pattern Instructions
For Plushies:
Head:
Body:
Arms (make 2):
Legs (make 2):
Ears (make 2):
Assembly:
– Attach the safety eyes to the head between Rounds 6 and 7, spaced 4 stitches apart.
– Sew the head to the body securely.
– Attach arms and legs carefully, ensuring they are positioned evenly for balance.
– Place the ears on top of the head and secure them firmly.
– Optionally, use a small piece of fabric to create a bow and attach it to the head for an extra summer flair.
6. Closing & Social Engagement
Congratulations on completing your Summer Hello Kitty Plush! I would love to see your version! Leave a comment below with your color choices and any modifications you made. What color combination will you try? Don’t forget to share your finished plushie on social media! Happy crocheting!