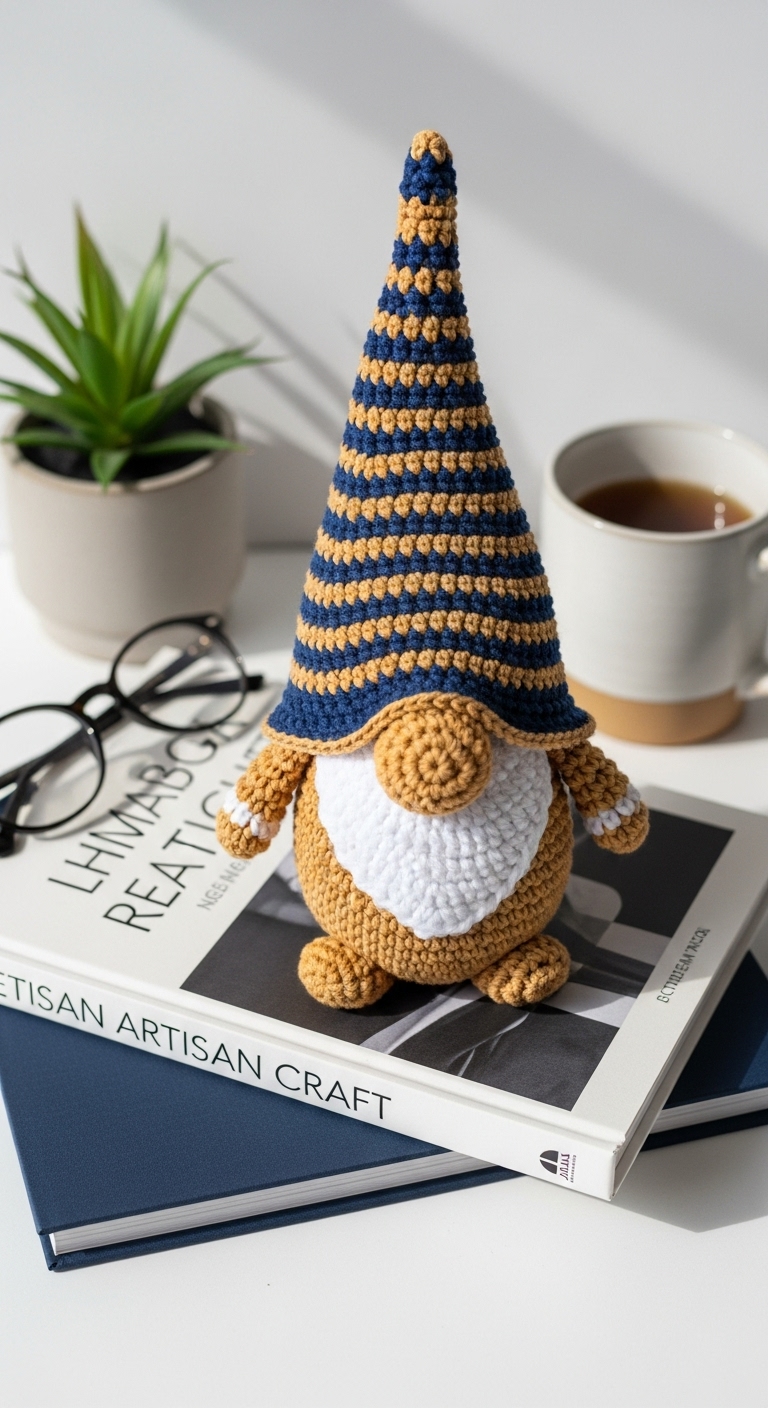
gingerbread gnome free crochet christmas pattern
2. Introduction
Get ready to spread holiday cheer with this delightful Gingerbread Gnome, a whimsical addition to your festive decor! Standing at approximately 10 inches tall, this charming plushie captures the spirit of the season with its sweet gingerbread-inspired colors and playful design. Crafted from soft, cozy yarn, this gnome is sure to warm hearts and homes alike.
For this project, you’ll use medium-weight yarn in a soft brown for the body, a cheerful white for the beard and icing details, and a vibrant red for the hat and accents. These adult-friendly colors not only evoke the feeling of freshly baked gingerbread but also create a modern and stylish look that fits right into your holiday decorations. This project is not only fun and quick to whip up but also serves as a perfect gift for friends and family, making it an excellent choice for your holiday crafting!
The Gingerbread Gnome pattern is beginner-friendly, offering a great opportunity for new crocheters to practice their skills while creating a festive piece. Whether you’re looking to adorn your home or gift a loved one a handmade treasure, this gnome is sure to bring joy and smiles this Christmas season!

3. Materials Needed
– Yarn: Medium-weight (4) yarn in:
– Soft Brown – approx. 150 yards
– White – approx. 50 yards
– Red – approx. 50 yards
– Hook: 3.5mm or 4.0mm crochet hook
– Eyes: 12mm safety eyes OR black embroidery thread
– Stuffing: Polyester fiberfill stuffing
– Needle: Tapestry needle for sewing
– Marker: Stitch marker
– Optional extras: Small buttons or beads for embellishment
4. Designer Notes / Tips
– Stitch technique: This pattern primarily uses single crochet (sc), with the occasional increase (inc) and slip stitch (sl st). If you’re new to these stitches, don’t worry—watching a quick tutorial can help solidify your understanding!
– Stuffing density: I recommend using a light amount of stuffing for the gnome’s body to keep it plush yet structured. You want it to hold its shape without being too firm!
– Assembly: Pay attention to the assembly section, as it’s crucial for the gnome’s final look. Use the tapestry needle to securely stitch pieces together, and don’t hesitate to use stitch markers to keep track of your rounds.
– Yarn substitutions: If you want a different texture, consider using cotton yarn for a smoother finish or a super bulky yarn for a larger gnome. Adjust your hook size accordingly!
– Gauge tips: While gauge isn’t critical for this project, a consistent tension will ensure your gnome is even. Aim for about 4 inches of fabric to have 12 sc stitches across.
– Safety considerations: If gifting to young children, consider using stitched-on eyes instead of safety eyes for added safety.
5. Pattern Instructions
For the Gingerbread Gnome:
Head:
Body:
Arms:
Legs:
Hat:
Assembly:
1. Attach the head to the body using the long tail from the head.
2. Sew on the arms to the sides of the body just below the head.
3. Attach the legs to the bottom of the body.
4. Position the hat on the head and sew it in place, allowing it to flop to one side for a whimsical look.
5. Use white yarn to create icing details on the hat and around the body for that perfect gingerbread effect.
6. Closing & Social Engagement
I’d love to see your version of this adorable Gingerbread Gnome! Whether you choose to make it in traditional colors or put a unique spin on it, leave a comment below to share your thoughts or ask questions. What color combination will you try? Don’t forget to share your finished gnome on social media—let’s spread the joy of crafting this holiday season! Happy crocheting!