free crochet gnome collection a year along crochet gnome cal

2. Introduction
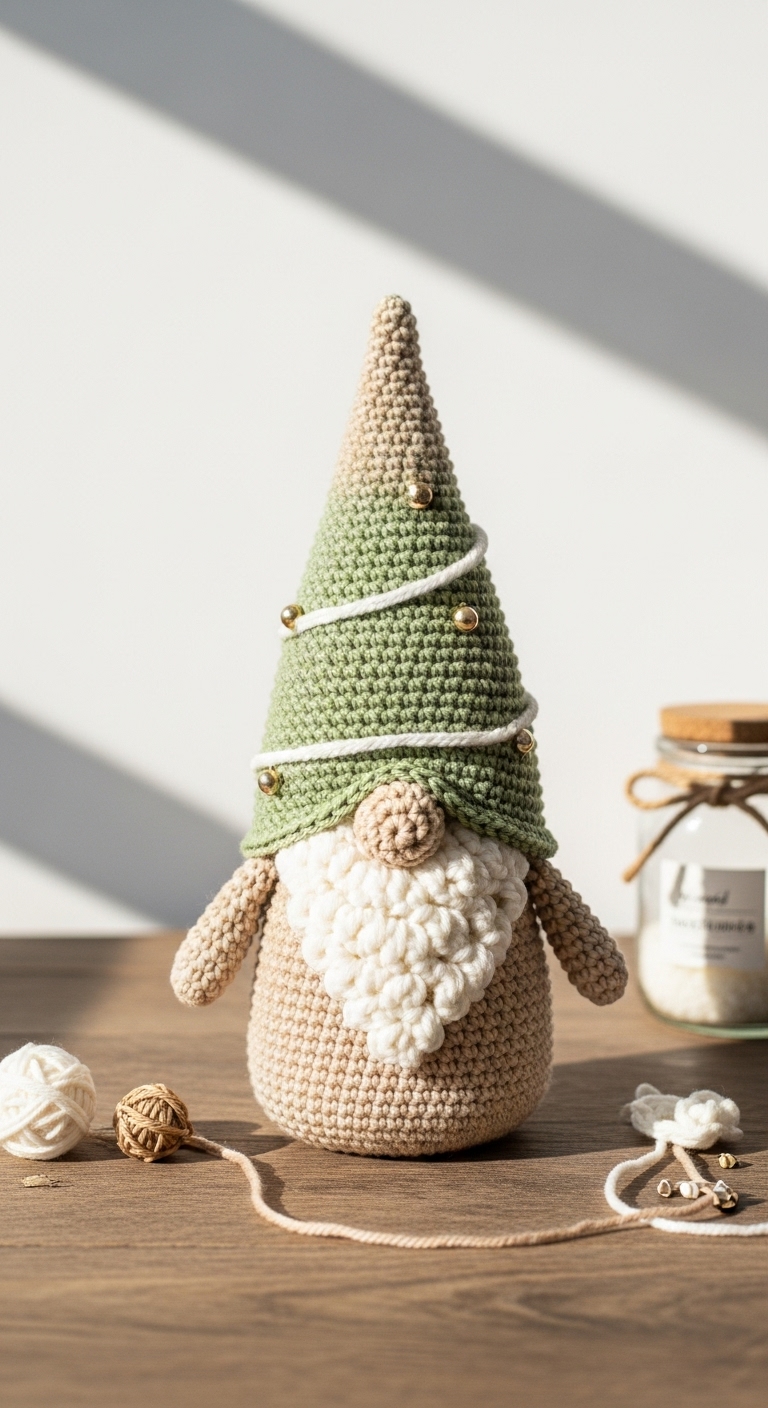
Welcome to the “Free Crochet Gnome Collection: A Year-Long Crochet Gnome CAL”! This delightful project invites you to create a charming set of crochet gnomes throughout the year, with each gnome representing a different season or holiday. Each gnome will be approximately 12 inches tall when finished, making them the perfect plush addition to your home décor or a whimsical gift for friends and family.
For this project, you will be using a medium-weight yarn in vibrant adult-friendly colors. We recommend a classic palette of forest green, soft beige, and deep red, which beautifully complement each other and capture the essence of each season. What makes this project truly special is its versatility; whether you want to decorate for the winter holidays or celebrate the blooming colors of spring, these gnomes will bring joy all year round. The pattern is beginner-friendly, making it accessible for crocheters who are eager to learn and experiment.
This crochet-along (CAL) is a fantastic way to engage with the crochet community, and each gnome you create has great gift potential. Imagine gifting a gnome that represents a loved one’s birthday month or a festive holiday! Let’s stitch together some magic throughout the year!

3. Materials Needed
– Yarn: Medium-weight (worsted) yarn in forest green (200 yards), soft beige (100 yards), and deep red (100 yards)
– Hook: 4.0mm crochet hook
– Eyes: Safety eyes (12mm) OR black embroidery thread for stitching
– Stuffing: Polyester fiberfill stuffing
– Needle: Tapestry needle for sewing
– Marker: Stitch marker
– Optional extras: Pipe cleaners (for the gnome hats), buttons (for embellishment)
4. Designer Notes / Tips
– Stitch technique: The pattern mainly uses single crochet (sc) and increases (inc) to create the round shapes of the gnomes. Don’t worry if you’re new to these stitches; they’re straightforward and perfect for practicing!
– Stuffing density: For a plush and snuggly feel, use firm stuffing, but be careful not to overstuff, as this can distort the gnome’s shape.
– Assembly: When joining pieces, take your time to align them properly. Use a tapestry needle to weave the ends securely for a neat finish.
– Yarn substitutions: If you prefer a different yarn, any medium-weight yarn will work. Just keep in mind that the final size may vary slightly depending on the yarn used.
– Gauge tips: A loose tension might result in a larger gnome, so ensure you maintain an even tension while crocheting.
– Safety considerations: If making this project for children, consider using embroidered features instead of safety eyes and avoid small embellishments that could be a choking hazard.
5. Pattern Instructions
For Plushies:
Gnome Body
– Head:
– Body:
– Arms (Make 2):
– Legs (Make 2):
– Assembly:
1. Attach the head to the body using the long tail of the head.
2. Sew the arms to the body just below the head.
3. Attach the legs to the bottom of the body securely.
4. If using a pipe cleaner for the hat, shape it first and then sew the top of the hat onto the head.
For Accessories:
– Hat:
– Attach the hat to the top of the gnome’s head, securing with a few stitches.
6. Closing & Social Engagement
I hope you’re as excited as I am to embark on this magical crochet journey! Each gnome you create brings a bit of seasonal cheer into your home and will surely be cherished by anyone who receives one. I’d love to see your version of these gnomes! Leave a comment below sharing your thoughts, and let me know what color combination you plan to try. Don’t forget to share your finished gnome on social media with our crochet community; we can’t wait to see your creativity shine!